

Bump Switch Basics:
What is a Bump Switch?
Bump switches (sometimes called snap-action switches or limit switches) give Marty the sense of “touch”. Like all switches, they are devices used to make or break connections in an electric circuit.
In robotics, they can be placed on the outside of the robot allowing it to respond to the environment. When a bump switch is pressed, usually due to the robot coming into contact with (or “bumping” into) something, it completes an electric circuit and sends a signal to the control board.
What Can I Do With a Bump Switch?
They can be used for all sorts of things in robotics!
Some uses include:
+ Detecting when Marty walks into something (like a wall, or an object)
+ Detecting when Marty kicks a ball
+ Preventing Marty from walking off a table or other surface
+ Helping Marty to solve a maze
+ Helping Marty vacuum a room efficiently….
+ …anything else you can think of
When a bump switch is plugged into Marty’s control board you can detect whether it is being pressed or not using an Input Block in Scratch!
Connecting the Bump Switch to Marty
To connect a bump switch open up Marty’s head by loosening the two screws on either side of Marty’s face until you can open the face and access the electronics inside.
The switch has a black, red and white cable which can be twisted to make it neater before you connect it. It can be plugged into any of 8 “GPIO” ports on Marty’s control board. It is important that it is plugged in with the white cable at the top.
*Question: What is a GPIO port?
Answer: A GPIO port is a “General Purpose Input/Output” port. It is basically a pin (or port) on a circuit board that does not have a specific function assigned to it. This means it can be used to connect additional sensors or other components, like we are doing here.*
In the figure below, the bump switch is connected to Input 0, so will be readable in Scratch on input 0.
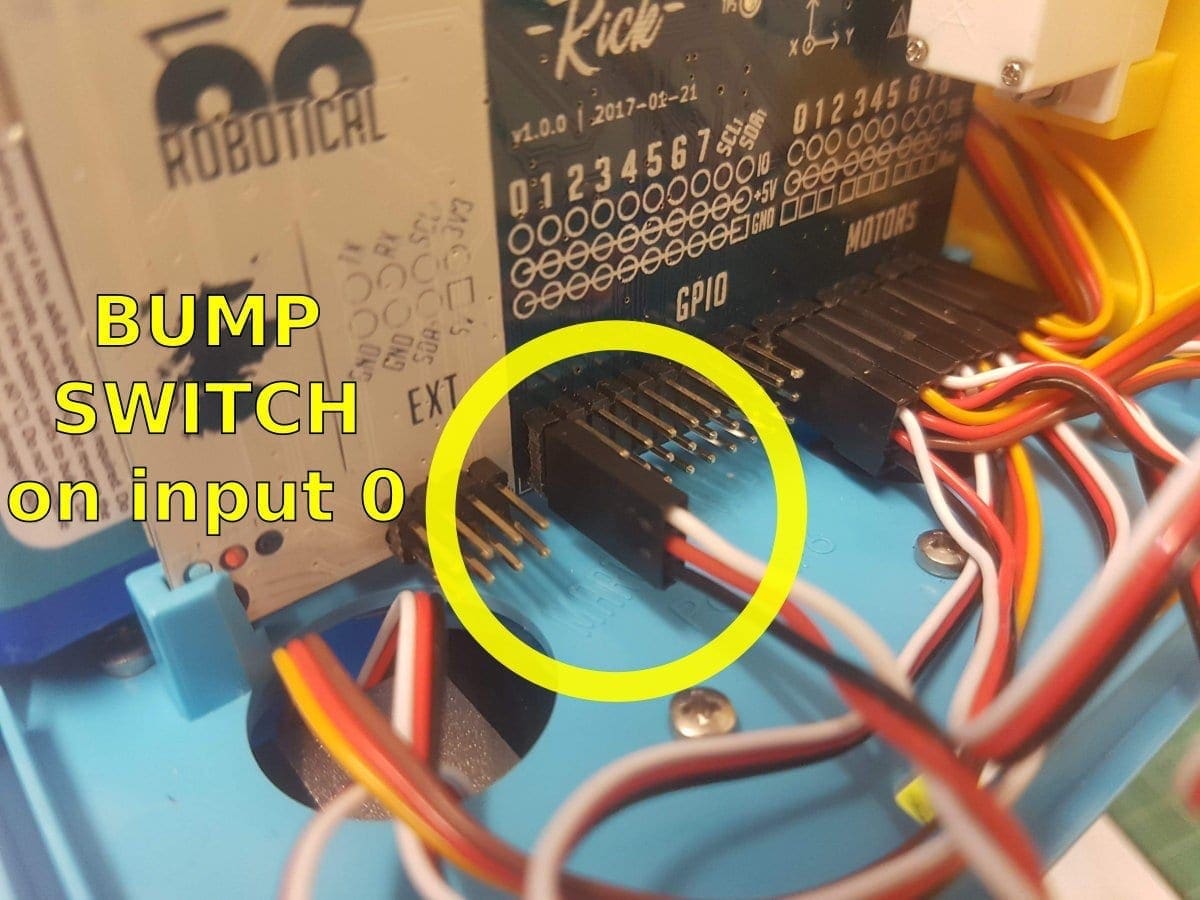
Connecting a switch to input 0
It is often easier to temporarily take off an arm to give more working room – these lift out quite easily.
The cable for the switch can be passed through any of the openings on the base of Marty’s head – for example one of the ones in the back as shown in the picture below.
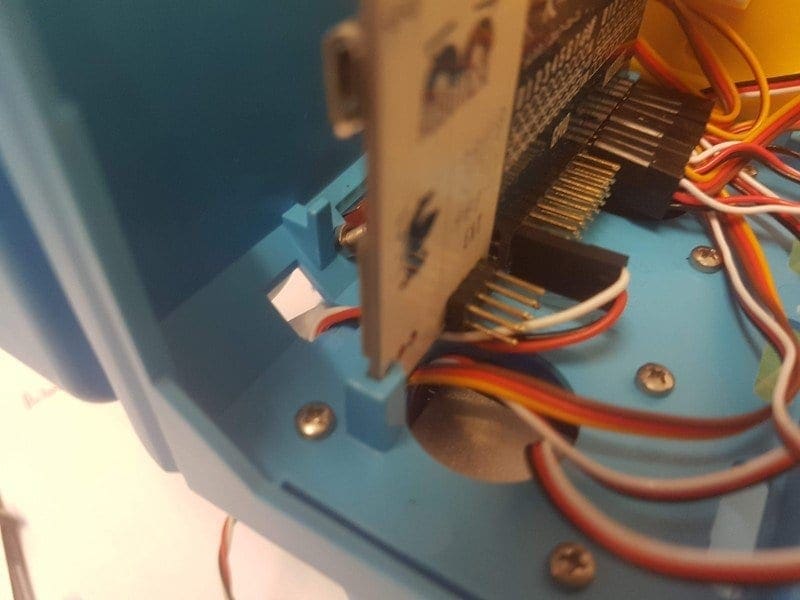
Passing the bump switch wires out an opening on the base of Marty’s head
The switch itself can be attached to the foot in various places, using two small M2 nuts and bolts. In the pictures below it is shown connected to the front of Marty’s right foot.
The photos here show Marty with a switch connected. Cable ties can be used to keep the wire out of trouble – **but make sure to leave enough slack that Marty’s leg can still move properly through the full range of movement!**
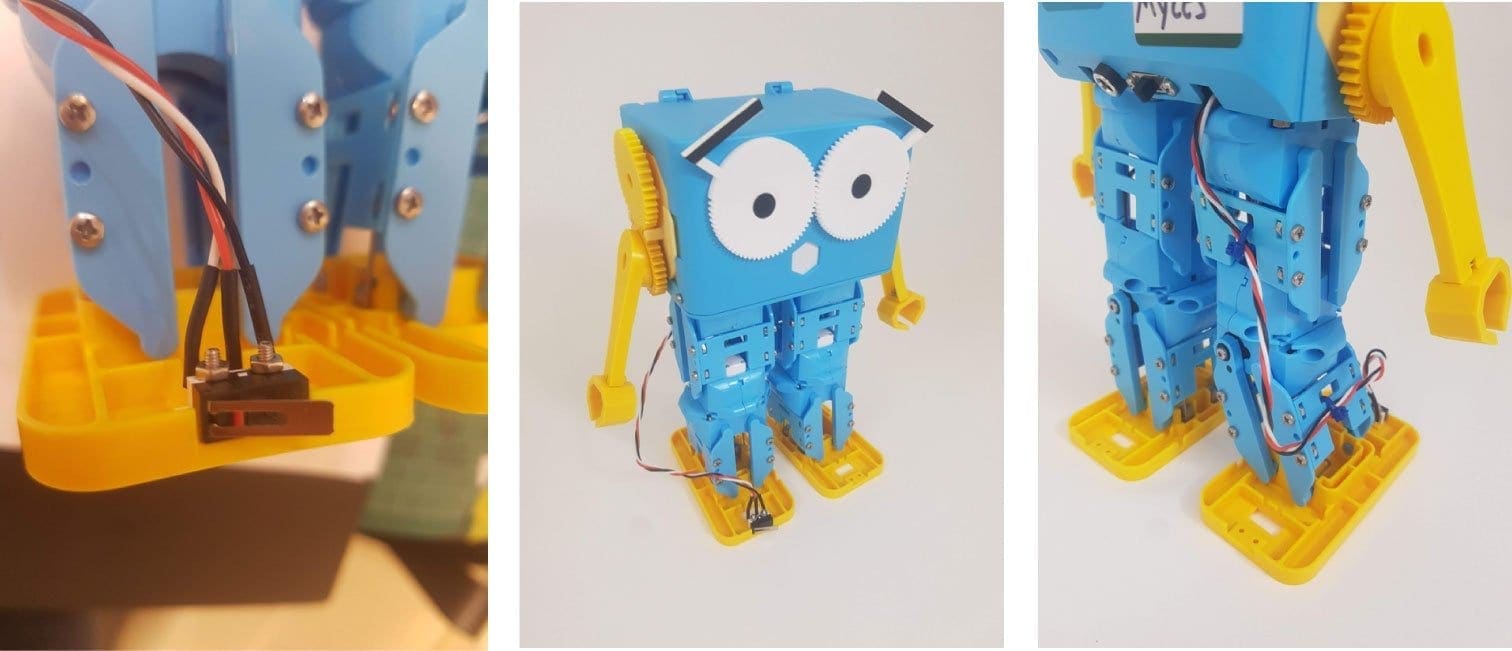
Connecting the bump switch to Marty’s foot
Using the Bump Switch in Scratch
Towards the bottom of Marty’s scratch blocks, you’ll find a block that looks like this:

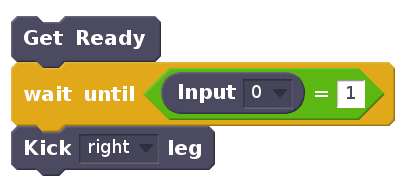
Double click the block to check the current state of the bump switch. A “1” means the bump switch is pressed, and a “0” means it is unpressed.
Waiting for a switch press
One of the simplest ways to use a bump switch in Scratch is to wait until it is pressed before performing an action. For example, the following block of code will wait until the bump switch is pressed before kicking the right leg. For example if you want Marty to play football, using a bump switch ensures he only kicks his leg when the ball is by his foot.
Reacting to an obstacle
**Marty has quite slidy feet, and on a slippery table he might slide backwards instead of activating the bump switch. This can usually be overcome by putting some sticky tape on the table to give a grippier surface. Make sure you use tape that won’t mark the table.**
You could use a simple loop to check if the bump switch is pressed at the end of each step, like this:
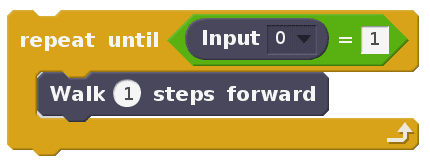
But that will only check if the switch is pressed at the end of the step, when it’s most likely it’ll be pressed halfway through.
To accommodate this we could write some code (block b) to keep track of the bump switch’s value in a variable (called “bumped” here). This code can be run at the same time as the code telling Marty what to do when the bump switch is pressed (block a). The concept of running two blocks of code at the same time is known as running “In parallel”.
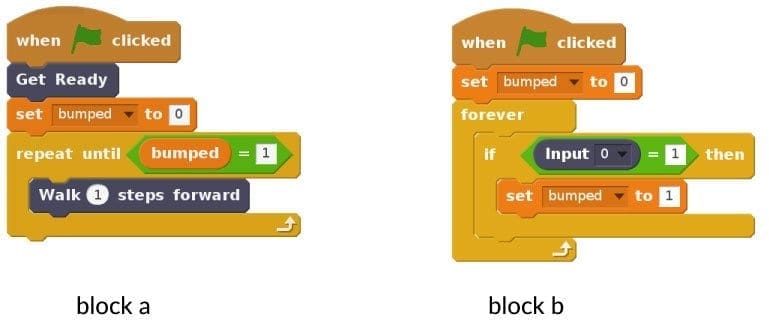
This way, when Marty gets to the end of each step, we will know if the bump switch was pressed at any point during that step. That’s a much more reliable way to keep track of collisions.
Stop and …
It would be even smarter to be able to react the instant a collision happens and the bump switch is pressed, rather than waiting until the end of the step.
That’s also possible, and we can use the “Stop and …” block to interrupt the movements that are currently running on Marty.
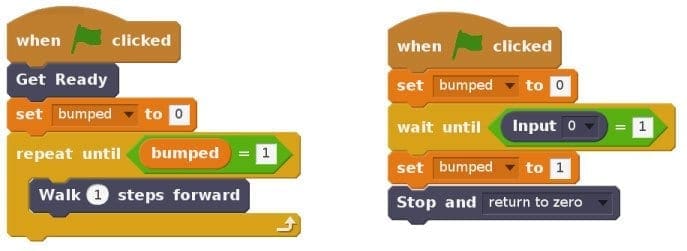
There are a few options for the stop block. “Return to zero” will return Marty to the standing position as directly as possible. You could also finish the current movement, freeze, disable the motors, or pause the current movement (you can resume using the “enable motors” block).
Exploring the World!
Over the coming weeks we will post some more articles giving instructions for how to use a bump switch to expand Marty’s abilities! Soon your Marty will be able to navigate mazes, stay safely on top of tables and potentially even hoover your room efficiently! In the meantime, check out our learning portal for more fun Marty activities!

Other posts you may like
How to Teach Your Kids to Code
Perhaps your kids have already tried a micro:bit in class or started coding with Scratch in an after-school club. If they are showing an interest in coding, continuing that learning...
Why is AI Literacy Important?
As we mark AI Literacy Day, it is worth asking a crucial question: why does AI literacy matter so much for today’s students? It's a fundamental part of the digital...
Why Probeware Matters in Science Education
In today’s classrooms, hands-on learning is essential. Students learn best when they can see, measure, test, and experience concepts directly. That’s where probeware comes in. By giving learners the tools...
TRY MARTY
FOR FREE
Are you looking for new STEM resources for your classroom? Robotical are loaning Marty the Robot to schools for no-obligation, 2 week trials.